Commenting really creates a community of learners. Once students beginning commenting on your blog, it transforms into an interactive community where learning takes place. There's something about the term "global audience" that encourages students to write their best. Therefore, blog commenting does lend itself to improving the quality of student writing. But, with every writing assignment, preparation is key. Teachers should model the commenting process, share examples of good, not so good, and bad comments. Once commenting guidelines and expectations are established, though, students tend to thrive where commenting is concerned. There are even ways the teacher and his/her students can use commenting to keep the conversation going among learners. Students, no matter there age, love sharing their work, and what better setting than that of 'blogging and commenting.'
Watch this video created by a California classroom explaining the importance of commenting. They give multiple tips for encouraging good blog comments.
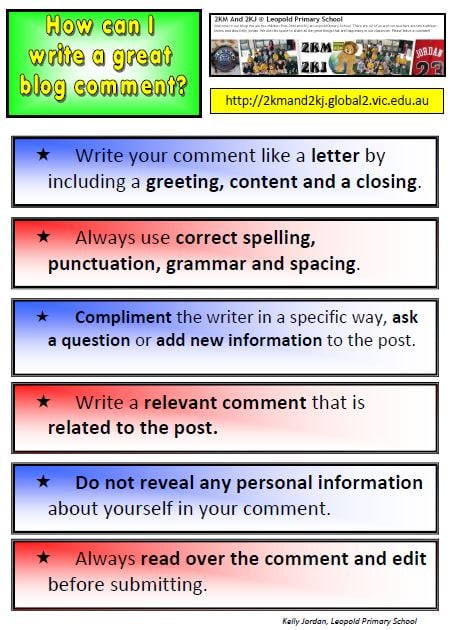
Here are your tasks for this week: Task One: Create a new page called, "Commenting Guidelines." Create a list of guidelines you would like for your students to follow as they post and leave comments on your blog. For example is correct grammar important. What about not revealing any personal information, like where you live and a your last name? A good place to start would be to check out other teacher blogs who have already established commenting guidelines. Listed below are a few you might get some ideas from: Ms. Ward's Classroom Blog-Scroll down until you see Ms. Ward's Blogging Guidelines. Mrs. Sprinkle's Classroom Blogs Huzzah! Commenting Poster
Task Two: Create a post that discusses commenting. Include an image or embed a video. Remember to give proper credit.
Task Three: Leave a comment on this blog about the importance of leaving quality comments. Leave the URL of your blog post.
Task Four: Complete the survey (coming soon here) about the blogging challenge.
Task Five: After you have completed each of the challenges, send a copy of your log with your hours to Ms. Ward for your points. Keep on blogging!
Embedding Media: Edublog, Blogger, and Classblogmeister allow you to embed media like slides, videos, comic strips, polls, and much more into your blog posts. Use this code to add interactive media to your blogs, to give your reader a way to interact with your blog beyond just using text and images.
Glogster - Glogster gives you (or students) the ability to combine images, photos, music, video, and audio for interactive posters. Here's an example of a student's glog embedded on Ms. Ward's blog.
SlideShare - a site where you upload powerpoint presentations to share with others.
Scribd - a site where you can upload Word Documents, PDFs, or powerpoints and then embed on your blog.
VoiceThreads - you can create an interactive slideshow with videos or images. Readers can comment on the images/videos by adding text, audio, or video. See an example on Mrs. Sprinkle's blog.
Youtube and Teachertube - both sites have videos that are uploaded and can be embedded in your blog posts.
Activity 1 - Embed a video on your blog. For Blogger and Edublogs, copy the embed code from Youtube or Teachertube. Paste the code into your blog post. If your video is located on your computer, click the 'Add Video' button on your menu bar to upload your video. For Class Blogmeister, copy the embed code from Youtube/Teachertube. In text mode, post the code into a new article. Classblogmeister will not host the video for you, so if you want to use your own video, you must upload it to Youtube or Teachertube first.
Activity 2 - Embed a powerpoint presentation or slide show. Choose from powerpoints other people have provided on slideshare or create your own and upload it to slideshare or scribd. For Blogger and Edublogs, copy the embed code and paste into your blog post. For Classblogmeister, paste it into a new article while in text mode.
Activity 3 - Check out your fellow bloggers videos! Leave a comment on two other participants' blogs about their media choices.
Activity 4 - Respond to the following question in a comment below: If a picture says 1000 words, what does a video, animated slide show, or multi-media say?
Everyone deserves a break, and this is a good time to reflect and catch up on any weeks you may have not finished in this challenge. We would like to encourage you to check out the following two videos.
The first video was created by commoncraft.com. It explains blogging in a really easy to understand format. It would also be a great video to use when introducing blogging to your students. Enjoy!
Thanks to Mrs. Gary for reminding us about Voki.com. According to their website, "Voki is a free service that allows you to create personalized speaking avatars and use them on your blog, profile, and in email messages." You can view two Voki avatars here-one on Mrs. Sprinkle's class blog and one on Mrs. Gary's class blog. We think Voki could be used as a strategy for student learning. Students or groups could create a Voki to demonstrate their knowledge of a class topic. What do you think?
The second video, created by young students, explains how to create a Voki and upload it to Blogger. If you are using Edublogs or Blogmeister, use the directions for uploading a widget. It works the same way.
If you are all caught up, consider creating a Voki for your class blog. We would also appreciate your ideas. Leave us a comment on how you think Voki could be used within your classroom.
What is a blogroll, you ask?
A blogroll is a list of hyperlinks that are your recommendations to other websites you find beneficial. A educational blogroll might point students to various sites that may be helpful to learning or reviewing specific content. Teachers at FMS, for example, might want to add a link to their Schoolnotes page. Let's face it! We have many websites we would like to recommend to our students, and this is one place to begin.
A good example of a Blogroll is on this blog. Notice how we have our teacher blogs listed in one Blogroll and blogs to explore in another. Visit Mrs. Sprinkle's Classroom Blog to view how she has her Blogroll set up into different categories. Ms. Ward's blog also has a 'related links' blogroll on her class blog.
Activity 1-Setting up your Blogroll
For Edublogs, under Appearance in side bar on the left, click on Widgets. Click and drag the Links (grey bar) over into your Sidebar. You will then be to click on the Links tab on the left side of your screen. You will then see 'Edit,' 'Add New,' and 'Links Categories.' You will then be able create categories for your blog roll, including 'favorite links' and 'blogs.' After you create your categories, you will then be able to add them to your Blogroll. To add a new website or blog, click on 'Add New,' type the name of your websites, and copy and paste there web addresses.
For Blogger, go to Design, go to Add a Gadget, go to Blog List and click the plus sign. You can change the name of your Blogroll if you like. You will then add titles and copy and paste or type in web addresses of your favorite blogs.
For Blogmeister, DIRECTIONS WILL BE ADDED BY TUESDAY, MARCH 22.
Activity 2-Now add at least 5 of your favorite classroom websites to this blogroll.
Activity 3-Create a new post on your blog telling about your blogroll. Encourage visitors to visit at least one link you have posted.
Activtity 4-Leave a comment on this post describing how you think a blogroll can be useful to your students or others that may visit your class blog.
This week you will learn how to upload images your your blog posts. There will be a focus on giving proper credit to the photos you use and an introduction to Creative Commons will also be given. Bloggers will learn about how to upload images from their digital camera and/or computer, and write a blog post that includes a Creative Commons image. Adding a photograph to your blog post is like adding icing to the cake. Adding an image to a blog post encourages your audience to read your post. A pictures speaks a 1,000 words, and this week will be an example of that. However, we can't use just any image we want. Why? The law automatically grants full rights of images to the original creator. So what's the solution you ask? Well, image rights can be granted through Creative Commons licensing, or photos taken by you may be used. What is Creative Commons, you ask? The group provides a free way for individuals and groups to license their work. According to their website, their "tools give everyone from individual creators to large companies and institutions a simple, standardized way to keep their copyright while allowing certain uses of their work — a “some rights reserved” approach to copyright — which makes their creative, educational, and scientific content instantly more compatible with the full potential of the internet. The combination of our tools and our users is a vast and growing digital commons, a pool of content that can be copied, distributed, edited, remixed, and built upon, all within the boundaries of copyright law. We’ve worked with copyright experts around the world to make sure our licenses are legally solid, globally applicable, and responsive to our users’ needs."
Activity 1-Watch this short video to learn about the Creative Commons License.
Search through photos to find a photo you like. Right click on your chosen photo, and click 'save image as.' You can save your photo to your desktop or other desired location on your computer for uploading to your blog post. Make sure to check the licensing agreement first. You want to make certain you have permission to use the image before you post it to your blog. You can also set limits within this site so your search will only locate Creative Commons images.
How do I add a photo to my blog?
Blogger-Click the add image button. Click, choose file to find your image on your computer. Pick your chosen layout, and then click upload image.
Edublogs-Find and click the add image button located on the 'add media' line of your new post. Select your chosen photo from your computer, and upload the image.
Blogmeister-To post a picture using classblogmeister, you will need to upload it to the internet. You can host your pictures on www.imageshack.com for free. To use imageshack, you can create a free account and upload your pictures. Once a picture is uploaded, click on “View Full Size” and copy the URL. You will need to paste the URL into a set of html code and post it in a new article. The code is:
Replace the hi-lited URL with the URL of your picture. Paste the code into a new article using Text mode. If posting multiple pictures, press “Enter” between each set of code. Giving proper photo credit is important, too. Here is one way to give proper credit to your photo. Photo by: Uwe Hermann licensed under Creative Commons Attribution ShareAlike 2.0 Generic. Just highlight and copy the link in your web address window, highlight your text in your blog post, click on the 'insert link' button (usually shown by a globe and chain link) in your menu bar, and paste the copied URL into the window. The bottom of this blog post also demonstrates another way to give proper credit to a photo.
Activity 3-Visit two blogs from any of our blog rolls (list of blogs on right hand side of this website) to see how other bloggers use images within their blogs. Leave a comment on at least one of these blogs.
Activity 4-Now it's your turn! Create a blog post that includes at least one image. Write about using images within your blog. Why are images useful on your blog? Why is it important to give proper credit for images that do not belong to you? How do you think using images can help your students learn? What did you learn from viewing images on other blogs? Any other ideas about the use of blog images?
Activity 5-Leave a comment on this blog post about using images.
When blogging, it's important to give your readers a sense of who you are and where you come from. It is also important to keep your identity safe. This week's challenge involves just that. From blog posts to widgets and photographs to video, there are many ways to help your viewers get a better view of you.
Activity 1: Add a widget or two to your blog. A widget is a small application that can be installed within a webpage. Widget Box- Widget Box has many widgets that allow you to place items like clocks, translators, the weather, or the current news on your blog. ClustrMaps ClustrMaps allow a blogger to track the number of visitors to their blog and also identifies where in the world they are visiting from. Shelfari Shelfari is a really cool widget allowing a blogger to post books they have read or are currently reading.
Directions: To add a widget to your sidebar, copy and paste the embed code into a text box on your sidebar. Save then close. If the widget is too wide, adjust the ‘width number’ in the embed code which may appear more than once within the code. Note: If using Blogger, go to Design and Add a Gadget. Then insert the code into a text box. If using Class Blogmeister, login and go to "Control Panel." Under the paragraph you wrote for "About You," hit return and then paste in the copied embedded code. For each additional widget, paste in under the first, making sure to hit return after each one to keep the code separate.
Activity 2: 7 Random Facts-Thanks to Huzzah for this idea. As we begin to use blogging with our students, it is very important we teach them blogging safety. Follow the Huzzah link and read this blog post. Then, create your own post with 7 Random Facts about yourself. As you brainstorm, try to include a wide variety of facts that close friends and family would know about you, but that doesn't give away personal information about you.
Activity 3: Use the "2011 FMS Blog Challenge" list below the red clock to read other teacher's random facts. Leave a comment on at least two fellow teacher's blog post about their seven random facts.
Ready or not, here comes the first 'FMS Blogging Challenge." It is our belief that blogging can be fun, addicting, and helpful to our students. We want to help you develop your blogging skills so you feel comfortable blogging with students. Monday, February 28 marks week one of our six week challenge. This week will have four main activities. Please work to complete the following four tasks:
Activity One-"About Me" Page Most blogs have an "About Me" page. Typically referred to as "About," "About Me," or "My Profile," it is important that you introduce yourself. So, either write or update the page about yourself. Don't give out too much personal information about yourself. Your "About Me" page may become an example for your students if you should ever choose to have students create blogs. If you have already completed this step revisit your page. Update the information, and check for clarity. You might consider adding a photograph of your classroom or yourself. Directions: For Blogger: Go to the "Posting" tab. Find "Edit Pages" across the top. Click on "Edit Pages." Click on "New Page" or "Create a Page." Next, give your page a title like, "About Me." Add a paragraph or so about yourself. You might want to include subjects you teach, your hobbies, and other general information about yourself. When finished, click on "Publish Page." For Class Blogmeister:
Activity Two-"Write a post to answer these questions."
Give your post a unique title. Question 1-Why blog? Why did you decide to create a blog? Question 2-Why did you decide to participate in the FMS Blogging Challenge? Question 3-What do you hope some of the blogging activities include? Quesiton 4-What do you hope to get out of this challenge?
Blogging involves commenting. Every blog post has a commenting section located near the bottom of the post. Comments are part of blogging. They are as much of an art as creating the post itself. So practice your commenting skills by leaving a comment on this post for us to read.
Activity 3-Create an avatar to represent you.
An avatar is a picture or virtual icon that represents you. Ms. Ward has a photo of herself on her blog. Mrs. Sprinkle has a cartoon figure avatar.
After you have created your avatar, you will need to save it as a jpeg file on your computer. Follow these directions for uploading your avatar. For Blogger-Go to your dashboard. Click on "Edit Photo." Upload your photo. Save. For Edublogs-Go to edublogs.org and log in. Click "Upload New Avatar" to upload your photo. For Blogmeister-Once logged in, click on Control Panel at the top of the screen. Scroll down to the section that says “Upload images.” Next to personal image - click on “Browse” to find your photo or avatar on your computer, then click “Upload.”
Activity 4-Leave a comment on this post describing one or two ways you could use blogging with your students.


